Last updated: 2026-03-25
Material & Measurement

Sheet Cutting Calculator

Free online sheet cutting calculator and plywood cut calculator for professional panel layout optimization. Calculate sheet material requirements for 4×8 and custom panels, generate optimized cutting patterns with kerf compensation, and minimize material waste for cabinet, furniture, and construction projects.

Cutting Optimization Waste Analysis Cost Calculator Multiple Panels

Sheet & Panel Specifications

Plywood Sheet Size

inches

Panels Needed

Cost Analysis

$
$ per sq ft

Calculation Results

Enter panel dimensions and click "Calculate Sheet Requirements" to see your cutting optimization and material analysis.

Use safety equipment. Account for kerf width. Verify measurements before cutting.
Calculations are optimization guides. Test layouts and verify actual sheet dimensions before cutting.

How to Use This Calculator

  1. 1
    Enter Sheet Dimensions Input your plywood sheet size (standard 4x8 is 48 x 96 in). Supports inches, feet, cm, and mm.
  2. 2
    Add Panel Sizes Enter each panel or piece to cut. Include dimensions and quantities for all required panels.
  3. 3
    Set Blade Kerf Enter your saw blade kerf width (typically 1/8 in standard, 3/32 in for thin-kerf blades).
  4. 4
    Calculate Results Click Calculate to get optimized cutting patterns, waste analysis, and total sheets needed.
  5. 5
    Review Layout Examine the suggested cutting layout to maximize sheet material efficiency and minimize waste.
Pro Tip: Group similar-sized pieces together, consider grain direction for visible surfaces, and always verify actual sheet dimensions before cutting.

Plywood Cutting Layout Optimization Strategies

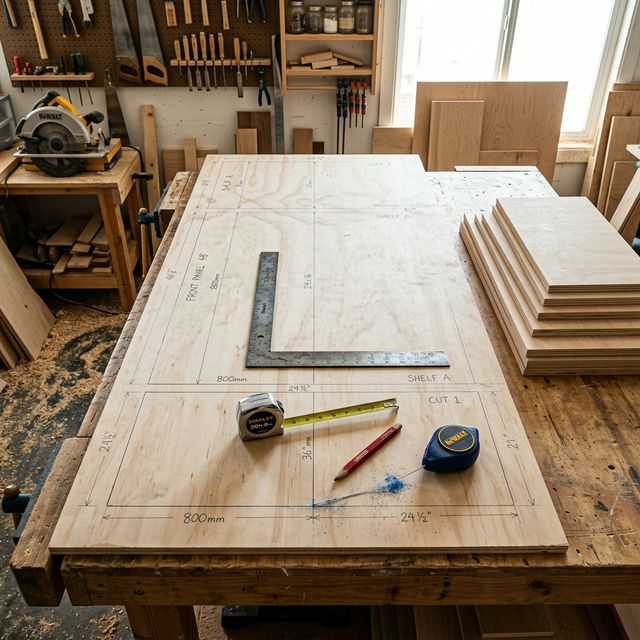
Optimizing your plywood cutting layout is the foundation of efficient material usage. A well-planned cutting pattern can mean the difference between purchasing 3 sheets or 4 for the same project, directly impacting costs and waste.

Key Principles for Optimal Panel Layout

  • Group Similar Dimensions: Organize your cut list by grouping panels with similar lengths or widths for efficient strip cutting.
  • Test Both Orientations: Always evaluate portrait and landscape for each panel — a 24"x18" panel might fit better rotated.
  • Consider Grain Direction: For visible surfaces, plan cuts so face grain runs in the desired direction. Standard 4x8 plywood grain runs along the 8' dimension.
  • Sequential Cutting Strategy: Start with rip cuts along the length, then make crosscuts. This maintains stability and improves safety.
  • Margin for Error: Add 1/16" to 1/8" to critical dimensions as a safety margin for final trimming.

Common Layout Patterns

  • Strip Cutting: Rip the sheet into strips matching panel widths, then crosscut to length. Best for multiple similar-width panels.
  • Grid Layout: Divide the sheet into a grid for many identical pieces.
  • Mixed-Size Optimization: Place larger panels first, fit smaller pieces into remaining space.
  • Nested Layout: For irregular or angled cuts, nest shapes together like puzzle pieces.
Overhead view of a woodworker's workbench with a plywood sheet marked with pencil lines and measurements, framing square and tape measure arranged for planning cuts
A well-planned cutting layout marked on a plywood sheet can reduce material waste by 15–30% compared to ad-hoc cutting. Marking all cuts before making the first one ensures optimal sheet utilization.

Sheet Material Calculator: Beyond Plywood — MDF, OSB, Particleboard & Melamine

While plywood is the most common sheet good in woodworking, this calculator works equally well for all panel materials. Each material type has unique characteristics that affect cutting strategy:

Material Comparison for Sheet Cutting Projects

Sheet Material Comparison: Cutting Characteristics & Best Uses (2026)
MaterialStandard SizesTypical KerfChip-Out RiskBest Application
Hardwood Plywood (Birch, Oak)4'×8', 5'×5'1/8"Low to MediumCabinet boxes, furniture, visible panels
Softwood Plywood (CDX, BC)4'×8', 4'×10'1/8"LowSheathing, subflooring, shop fixtures
MDF (Medium Density Fiberboard)4'×8', 5'×8' (49"×97")1/8"Very LowPainted surfaces, templates, router work
Particleboard / Chipboard4'×8'1/8"HighSubstrate for laminate, budget shelving
Melamine-Faced Board4'×8'1/8" (score first)Very HighCabinet interiors, closet systems
OSB (Oriented Strand Board)4'×8', 4'×9', 4'×10'1/8"LowStructural sheathing, subfloors
Baltic Birch Plywood5'×5' (60"×60")3/32" thin-kerf rec.Very LowDrawer boxes, jigs, CNC projects
Hardboard / Masonite4'×8' (1/8" or 1/4")1/16" track sawNoneDrawer bottoms, cabinet backs, templates
Actual sizes may vary by manufacturer. Baltic Birch is commonly sold in 5'×5' sheets in North America. Always verify dimensions before planning cuts.
Material-Specific Cutting Tips
  • MDF: Creates fine dust — always use dust collection and a respirator. Cuts cleanly with any blade.
  • Melamine: Score the cut line with a utility knife first, or use a scoring blade to prevent chip-out on the laminate face.
  • Baltic Birch: 5'×5' sheets require different layout planning than standard 4'×8' — our calculator supports custom sizes for exactly this reason.
  • OSB: Edges are rough — plan cuts so factory edges face outward when possible.

4×8 Plywood Cut Optimization: Real-World Project Examples

The standard 4'×8' (48"×96") plywood sheet is the most common panel size worldwide. Here are real-world cutting plans for popular woodworking projects, validated against actual shop conditions:

Project Example 1: Kitchen Cabinet Carcasses (10-Cabinet Set)

A typical 10-foot kitchen requires approximately 10 base and wall cabinet boxes. With a cut list of sides (30"×23"), tops/bottoms (30"×22.5"), and shelves (29.5"×22.5"), our calculator determines you need 7 sheets of 3/4" plywood with about 12% waste — versus 9 sheets without optimization.

Project Example 2: Bookshelf (36"W × 72"H × 12"D)

A standard bookshelf with 5 adjustable shelves requires sides (72"×12"), top/bottom (34.5"×12"), and shelves (34.5"×11.75"). This fits on a single 4'×8' sheet with room for the back panel if using 1/4" hardboard separately. Waste: approximately 8%.

Project Example 3: Shop Storage Cabinet (24"×48"×72")

A large shop cabinet maximizes the 4'×8' sheet: two sides at 72"×24" each consume exactly one sheet width (48") by the sheet length (96" allows one 72" cut plus a 24" shelf). With all components planned together, 3 sheets cover the entire project.

Professional woodworker using a circular saw to cut a 4x8 plywood sheet on sawhorses in a well-equipped workshop with warm natural lighting
Making a guided circular saw cut on a 4×8 plywood sheet. Always support the sheet on both sides of the cut to prevent binding, and use a straight-edge guide for precision rip cuts.

How to Read & Create a Plywood Cutting Diagram

A cutting diagram (also called a cut sheet or cut plan) is a scaled visual layout showing exactly where each piece will be cut from the raw sheet. Understanding and creating these diagrams is essential for efficient material use:

Key Elements of a Cutting Diagram

  • Sheet Outline: The outer rectangle represents the full sheet (e.g., 48"×96" for a standard 4'×8' sheet).
  • Cut Lines: Solid lines show where cuts will be made. The space between adjacent pieces represents the blade kerf.
  • Part Labels: Each piece is labeled with its name, dimensions, and often its quantity ("Side A — 30×23 — Qty 2").
  • Grain Direction: An arrow or annotation indicates which way the face grain runs, critical for visible panels.
  • Waste Areas: Shaded or hatched regions show offcut material that cannot be used for the current project.
  • Cut Sequence Numbers: Numbers indicate the order of cuts — typically rip cuts first, then crosscuts.

Best Practices for Cut Sheet Planning

  • Make rip cuts before crosscuts: This maintains the sheet's stability and makes handling easier.
  • Label every piece on the actual sheet with a carpenter's pencil or painter's tape before cutting.
  • Mark the "waste side" of each cut line to avoid cutting on the wrong side of your mark.
  • Account for blade kerf — our calculator does this automatically, but verify that your diagram includes kerf gaps between pieces.
  • Keep a reference copy of the cutting diagram at your workstation during cutting.
Multiple types of plywood sheets including birch, oak, and CDX stacked in a professional lumber rack at a cabinet shop
Plywood comes in many grades and species — from premium Baltic Birch (top) to utility CDX (bottom). Choosing the right material for each component reduces costs while maintaining quality where it matters.

Understanding Blade Kerf & Cutting Precision

Blade kerf — the width of material removed by the saw blade — is a critical factor many woodworkers overlook. Failing to account for kerf can result in undersized panels, wasted material, and incorrect yield calculations.

Standard Kerf Specifications by Blade Type
Blade TypeKerf WidthDecimalBest For
Standard Circular Saw1/8"0.125"General purpose, construction
Thin-Kerf Blade3/32"0.094"Material savings, less waste
Cabinet Table Saw1/8" – 5/32"0.125" – 0.156"Precision work, clean cuts
Track Saw~1/16"~0.063"Fine work, minimal waste
Actual kerf may vary by blade condition and manufacturer. Always measure your specific blade.
Impact of Kerf on Panel Yield

Consider a 4x8 sheet (48" x 96") cut into 12"-wide panels:

  • Without Kerf: 96" ÷ 12" = 8 panels (theoretical)
  • With 1/8" Kerf: 96" ÷ (12" + 0.125") = 7.9 → 7 actual panels
  • Material Loss: 7 cuts x 0.125" = 0.875" lost to kerf
Best Practices for Kerf Management
  • Measure Your Actual Kerf: Cut a test piece and measure. Blade kerf varies with age and sharpening.
  • Use Thin-Kerf Blades: Reduces material waste and requires less power.
  • Account for Every Cut: Add kerf width between every piece in your cut list.
  • Sharp Blades Save Material: Dull blades increase effective kerf and cause tear-out.

Material Waste Analysis & Cut Sheet Planning

Effective waste management in plywood cutting goes beyond minimizing offcuts — it involves strategic planning to ensure waste pieces can be repurposed.

Types of Plywood Waste

  • Edge Waste: Strips remaining along sheet edges (2-6" wide). Save for edge banding, jigs, or fixtures.
  • Corner Offcuts: L-shaped or rectangular pieces from corners. Valuable for drawer bottoms, templates, or test pieces.
  • Kerf Waste: Material removed by blade. Unavoidable but minimized through efficient layout and blade selection.
  • Unusable Fragments: Very small pieces or those with defects. Track these to understand true material efficiency.

Strategic Waste Utilization

  • Maintain a Cut-Off Bin: Sort usable offcuts by size ranges. Label with dimensions for easy retrieval.
  • Plan for Waste Usage: Identify small components (drawer bottoms, backs, dividers) that can use offcut material.
  • Calculate Waste Value: Professional shops target 8-15% waste for plywood projects.
  • Secondary Project Planning: Keep a list of shop improvements that can use accumulated offcuts.
Pro Tips for Minimizing Waste
  • Design with dimensions that align with standard sheet sizes (multiples of 12", 16", or 24")
  • Combine multiple small projects to cut from the same sheet efficiently
  • Consider increasing project dimensions slightly if it significantly improves utilization
  • 30 minutes of planning can save an entire sheet on large projects

Cost Optimization & Project Economics

Understanding the true cost of plywood cutting involves more than material price per sheet. Labor time, tool wear, setup complexity, and waste management all contribute to total project costs.

Total Cost Components for Sheet Cutting Projects
Cost CategoryTypical %Key Factors
Material Cost40–60%Sheet price, grade, quantity
Labor / Setup Time25–40%Complexity, precision needed
Tool Wear & Consumables5–10%Blade life, sandpaper, finishes
Waste Disposal / Storage5–10%Offcut value, storage space
Percentages are general references. Actual distribution varies by project scale and labor rates.
Cost Comparison: Kitchen Cabinet Doors (20 pieces, 18"x24")

Note: Hypothetical example for illustration. Actual costs vary.

Option A — Tight Optimization (3 sheets):

  • Material: $135 (3 x $45 example)
  • Cutting Time: 2.5 hours (complex, multiple setups)
  • Labor: $125 ($50/hr example)
  • Estimated Total: ~$260

Option B — Simple Layout (4 sheets):

  • Material: $180 (4 x $45)
  • Cutting Time: 1.5 hours (grid pattern)
  • Labor: $75
  • Waste offcuts worth ~$20
  • Estimated Total: ~$235 (saves ~$25 over Option A)

Glossary of Terms

Kerf

The width of material removed by a saw blade during cutting. Standard blades have 1/8" kerf; thin-kerf blades ~3/32". Must be accounted for in all cutting calculations.

Panel Yield

The number of usable panels that can be cut from a single sheet, after accounting for kerf and waste. Higher yield = more efficient material usage.

Cutting Optimization

The process of arranging panel cuts on a sheet to maximize material usage and minimize waste. Can reduce waste by 15-30%.

Rip Cut

A cut made parallel to the wood grain (typically along the length of the sheet). Usually made first to create strips.

Crosscut

A cut made perpendicular to the wood grain (across the sheet width). Made after rip cuts to produce final panel dimensions.

Grain Direction

The orientation of wood fibers in plywood. In standard 4x8 sheets, grain runs along the 8-foot dimension. Critical for visible surfaces and structural strength.

Sheet Goods

Flat panel products sold in standard sheet sizes, including plywood, MDF, particleboard, OSB, and hardboard.

Nominal vs Actual Size

Sheet goods are typically sold by nominal size (e.g., 4'x8') but actual dimensions may be slightly smaller due to manufacturing tolerances.

Frequently Asked Questions

How do I optimize plywood sheet cutting to minimize waste?

Use our sheet cutting calculator to plan cuts. Group similar-sized pieces, consider grain direction, and account for blade kerf. Test different combinations to find the most efficient layout. A well-planned cut list can reduce waste by 15-30%.

What is kerf width and why does it matter?

Kerf is the width of material removed by the saw blade. Standard blades use 1/8" (0.125") kerf, thin-kerf blades use 3/32" (0.094"). This affects how many pieces you can cut from a sheet and must be included in calculations.

Should I consider grain direction in my cutting plan?

Yes, especially for visible surfaces. Plywood grain typically runs along the 8' dimension. Plan cuts so face grain runs in the desired direction for both strength and appearance.

How do I calculate cost-effectiveness of different cutting patterns?

Compare total cost including waste. Sometimes buying an extra sheet for a simpler pattern is more economical than complex layouts. Consider time, tool wear, and the value of waste pieces.

What are standard plywood sheet sizes?

Most common: 4'x8' (48"x96"), followed by 4'x10', 4'x12', 5'x8', and 5'x10'. From a standard 4x8, you can cut 8 pieces of 2'x2' or 4 pieces of 2'x4'. Always verify actual dimensions.

How do I create an efficient cut list?

Enter all panel dimensions into our calculator. It generates optimized layouts showing how many sheets you need. Group similar dimensions, consider both orientations, and plan largest pieces first.

What is a sheet cutting calculator and how does it work?

It's a tool that optimizes how you cut panels from large sheets. It considers panel sizes, sheet dimensions, blade kerf, and generates a cut list showing exactly where to make each cut — saving money by reducing waste.

How many 2x4 panels can I cut from a 4x8 sheet?

From a standard 4x8 sheet (48"x96"), you can cut 4 pieces of 2'x4' (24"x48") perfectly with minimal waste (kerf losses only). Our calculator accounts for blade kerf to give exact results.

Can I use this calculator for MDF and other sheet materials?

Yes! It works for all sheet goods: plywood, MDF, particleboard, OSB, hardboard, and even acrylic or melamine. The optimization principles are identical. Different materials may require different kerf widths.

What's the difference between a plywood cut calculator and a cutting optimization calculator?

A plywood cut calculator determines how many panels fit on sheets. A cutting optimization calculator adds visual layouts, nesting algorithms, and waste minimization strategies. Our tool combines both approaches.

How do I account for kerf when planning cuts?

Kerf must be added between each cut. For 4 panels with a 1/8" blade: 3 cuts x 1/8" = 3/8" total kerf loss. Our calculator handles this automatically — just enter your blade kerf width.